PerfectFit / Fitting picture
One of the most common questions our customers have about purchasing their lenses online for a new frame they bought is how can they be sure their glasses will work for them in terms of vertical lens placement.
And rightfully so. No one wants to wear glasses where the lenses are not positioned properly.
|
Video: learn more about the importance of lens placement. |
Let us introduce PerfectFit™ to you. This one-of-a-kind process is based on a picture that is uploaded by you.
You only need about 3 minutes to take this picture. Our lab technicians will utilize them to get the correct vertical placement of your lenses (referred to as "vertical fitting height" or "seg height"). PD alone cannot guarantee a perfect fit for your glasses. Vertical placement is just as crucial.
 |
|
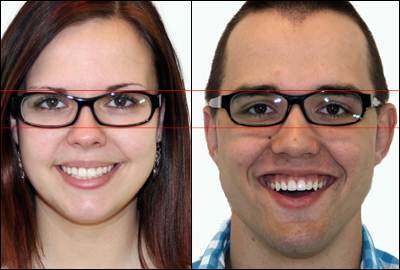
Vertical lens placement example: Here are two people wearing an identical pair of glasses. Take note of how their pupils sit in the frame at completely different heights. |
After checking out, you'll be given the choice whether you want to upload your pictures.
We believe that everyone should have affordable lenses, without having to sacrifice correct lens placement. We're proud to offer you a unique tool so you can rest assured that your glasses will be fitted with data based on your individual measurements, just like an optician would.
Providing us with this picture will aid us in making sure that your new lenses are tailored precisely to your face. It is easiest to have someone assist you. Otherwise, use the self timer on your digital camera.
Instructions for taking the fitting pictures are below.
| 1. | Use your digital camera. Use the highest pixel setting. Do not use your webcam. |  |
| 2. | Take a picture with flash. The flash will make two white dots appear in your pupils; this is the little channel in each pupil through which light reaches your retina. It is best to take the picture inside in a room that is not too brightly lit. Make sure you have the red eye prevention activated on your camera (a red eye will not show the white dots). Since a webcam does not have a flash, this will not work with a webcam. |  |
| 3. | With your side, line up against a wall. Make a little mark on the wall with tape, sticky note, pencil, etc., at your eye level. Then the person taking the picture will stand next to that and hold the camera at the level of the mark. You will stand opposite the person with your side lined up against the wall as well; lining up against a wall makes it easy to maintain the camera at the proper height and ensures you are looking straight at the camera. |  |
| 4. | The picture should be taken from a distance of about 2 meters (6 – 7 feet). Keep the camera lens level with the mark you made on the wall (thus at the height of the eyes). Important: Wear the pair of glasses you are going to send us for reglazing, and keep your head in your normal, most comfortable position. |
 |
| 5. | Focus your eyes on the camera. The person taking the picture should zoom in on your face. Snap the picture. The picture should look like the picture to the right. |  |
| 8. | Put the picture on your computer. Upload them when you are prompted to do so during the check-out process. We will take care of everything else. |  |